Coding Bootcamp: ASP.NET and Razor

ASP.NET & Razor

Razor syntax is a simple programming syntax for embedding server-based code in a web page.

In a web page that uses the Razor syntax, there are two kinds of content: client content and server code.

Client content

Client content is the stuff you're used to in web pages: HTML markup (elements), style information such as CSS, client script such as JavaScript, and plain text.

Server content

Razor syntax lets you add server code to this client content. If there's server code in the page, the server runs that code first, before it sends the page to the browser.

By running on the server, the code can perform tasks that can be a lot more complex to do using client content alone, like accessing server-based databases.

Server content

Most importantly, server code can dynamically create client content — it can generate HTML markup or other content on the fly and then send it to the browser along with any static HTML that the page might contain.

From the browser's perspective, client content that's generated by your server code is no different than any other client content.

ASP.NET web pages

ASP.NET web pages that include the Razor syntax have a special file extension (.cshtml or .vbhtml). The server recognizes these extensions, runs the code that's marked with Razor syntax, and then sends the page to the browser.

Sample Razor code

@{
  string message = "Hello World!";
}
<!DOCTYPE html>
<html>
  <head>
    <title>Sample Razor code</title>
  </head>
  <body>
    <h1>Message is: @message</h1>
  </body>
</html>

Razor syntax

The @ character starts inline expressions, single statement blocks, and multi-statement blocks.

<!-- Single statement blocks  -->
@{ var total = 7; }

<!-- Inline expressions -->
<p>The value of your account is: @total </p>

<!-- Multi-statement block -->
@{     
  var greeting = "Welcome to our site!";
  var weekDay = DateTime.Now.DayOfWeek;
  var greetingMessage = greeting + " Today is: " + weekDay;
}
<p>The greeting is: @greetingMessage</p>

That's it!

We can use any C# code we want...

Example

@{
  var showToday = false;
  if(showToday) {
    @DateTime.Today;
  }
  else {
    <text>Sorry!</text>   
  }
  foreach(var p in Posts) {
    <h2>p.Title</h1>
    <p>p.Content</p>
  }
}

IsPost property

The protocol used for web pages (HTTP) supports a very limited number of methods (verbs) that are used to make requests to the server. The two most common ones are GET, which is used to read a page, and POST, which is used to submit a page.

In general, the first time a user requests a page, the page is requested using GET. If the user fills in a form and then clicks a submit button, the browser makes a POST request to the server.

IsPost property

In web programming, it's often useful to know whether a page is being requested as a GET or as a POST so that you know how to process the page. In ASP.NET Web Pages, you can use the IsPost property to see whether a request is a GET or a POST. If the request is a POST, the IsPost property will return true, and you can do things like read the values of text boxes on a form.

@if (IsPost) {
  // do something
}
else {
  // do something else
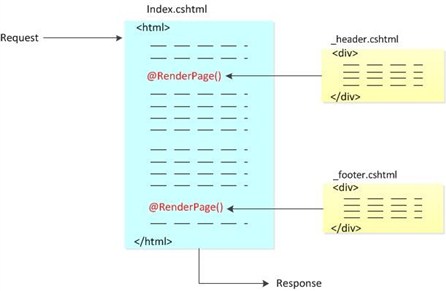
}

Creating a consistent look

To make it more efficient to create web pages for your site, you can create reusable blocks of content (like headers and footers) for your website, and you can create a consistent layout for all the pages.

@RenderPage()

ASP.NET lets you create a separate file with a content block that can contain text, markup, and code, just like a regular web page.

You can then insert the content block in other pages on the site where you want the information to appear. That way you don't have to copy and paste the same content into every page.

@RenderPage() example illustration

@RenderPage() example code

Consistent look using Layout Pages

A layout page defines the structure of a web page, but doesn't contain any actual content.

After you've created a layout page, you can create web pages that contain the content and then link them to the layout page.

When these pages are displayed, they'll be formatted according to the layout page.

RenderBody()

The layout page is just like any HTML page, except that it contains a call to the RenderBody() method. The position of the RenderBody() method in the layout page determines where the information from the content page will be included.

@RenderBody() example illustration

@RenderBody() example code

Structured Content


Lorem ipsum dolor sit amet, consectetur adipisicing elit,
sed do eiusmod tempor incididunt ut labore et dolore magna aliqua.


```

Multiple content sections

A content page can have multiple sections, which is useful if you want to use layouts that have multiple areas with replaceable content. In the content page, you give each section a unique name. (The default section is left unnamed.)

In the layout page, you add a RenderBody() method to specify where the unnamed (default) section should appear. You then add separate RenderSection() methods in order to render named sections individually.

RenderSection()

RenderSection() example

_Layout2.cshtml:

...
<body>
  <div id="header">
    @RenderSection("header")
  </div>
  <div id="list">
    @RenderSection("list")
  </div>
  <div id="main">
    @RenderBody()
  </div>
</body>

RenderSection() example

Content2.cshtml:

@{
    Layout = "~/Shared/_Layout2.cshtml";
}

@section header {
    <div id="header">
        Creating a Consistent Look
    </div>
}

@section list {
    <ul>
        <li>Lorem</li>
        <li>Ipsum</li>
        <li>Dolor</li>
        <li>Consecte</li>
        <li>Eiusmod</li>
        <li>Tempor</li>
        <li>Incididu</li>
    </ul>
}

<h1>Multisection Content</h1>
<p>Lorem ipsum dolor sit amet, consectetur adipisicing elit,
sed do eiusmod tempor incididunt ut labore et dolore magna aliqua.
Ut enim ad minim veniam, quis nostrud exercitation ullamco laboris
nisi ut aliquip ex ea commodo consequat. Duis aute irure dolor in
reprehenderit in voluptate velit esse cillum dolore eu fugiat nulla
pariatur. Excepteur sint occaecat cupidatat non proident, sunt in
culpa qui officia deserunt mollit anim id est laborum.</p>

Making content sections optional

Change

@RenderSection("header")`

to

@RenderSection("header", required: false)`

Alternative:

@if (IsSectionDefined("header")) {
    @RenderSection("header")
}

Passing data to layout pages

To pass data from a content page to a layout page, you can put values into the PageData property of the content page. The PageData property is a collection of name/value pairs that hold the data that you want to pass between pages. In the layout page, you can then read values out of the PageData property.

Passing data to layout pages

PageData example

Content3.cshtml

@{
    Layout = "~/Shared/_Layout3.cshtml";

    PageData["Title"] = "Passing Data";
    PageData["ShowList"] = true;

    if (IsPost) {
        if (Request.Form["list"] == "off") {
            PageData["ShowList"] = false;
        }
    }
}

@section header {
  <div id="header">
    Creating a Consistent Look
  </div>
}

<h1>@PageData["Title"]</h1>
<p>Lorem ipsum dolor sit amet, consectetur adipisicing elit,
sed do eiusmod tempor incididunt ut labore et dolore magna aliqua.
Ut enim ad minim veniam, quis nostrud exercitation ullamco laboris
nisi ut aliquip ex ea commodo consequat. Duis aute irure dolor in
reprehenderit in voluptate velit esse cillum dolore eu fugiat nulla
pariatur. Excepteur sint occaecat cupidatat non proident, sunt in
culpa qui officia deserunt mollit anim id est laborum.</p>

@if (PageData["ShowList"] == true) {
    <form method="post" action="">
      <input type="hidden" name="list" value="off" />
      <input type="submit" value="Hide List" />
    </form>
}
else {
    <form method="post" action="">
      <input type="hidden" name="list" value="on" />
      <input type="submit" value="Show List" />
    </form>
}

PageData example

_Layout3.cshtml

<html>
  <head>
    <title>@PageData["Title"]</title>
    <link href="~/Styles/Site.css" rel="stylesheet" type="text/css" />
  </head>
  <body>
    <div id="header">
      @RenderSection("header")
    </div>
      @if (PageData["ShowList"] == true) {
          <div id="list">
            @RenderPage("~/Shared/_List.cshtml")
          </div>
      }
    <div id="main">
      @RenderBody()
    </div>
    <div id="footer">
      <p>&copy; 2012 Contoso Pharmaceuticals. All rights reserved.</p>
    </div>
  </body>
</html>

Routing

Imagine that someone makes a request using this URL:

http://www.google.com/a/b/c

Routing

The search goes like this:

Otherwise...

Otherwise...

Routing

Inside a page, you can get the path information via the page's UrlData property, which is a dictionary. Imagine that you have a file named ViewCustomers.cshtml and your site gets this request:

http://mysite.com/myWebSite/ViewCustomers/1000

As described in the rules above, the request will go to your page. Inside the page, you can use code to get display the path information:

<head>
  <title>URLData</title>
</head>
<body>
  Customer ID: @UrlData[0].ToString()
</body>

Helpers

If you need to perform the same tasks on different pages in your site, you can use a helper.

ASP.NET Web Pages includes a number of helpers, and there are many more that you can download and install.

A list of the built-in helpers in ASP.NET Web Pages is listed in the ASP.NET API Quick Reference. If none of the existing helpers meet your needs, you can create your own helper.

Creating a helper

  1. In the root folder of the website, create a folder named App_Code. This is a reserved folder name in ASP.NET where you can put code for components like helpers.
  2. In the App_Code folder create a new .cshtml file and name it MyHelpers.cshtml.
  3. Replace the existing content with the following:

    @helper MakeNote(string content) {
      <div class="note"
           style="border: 1px solid black; width: 90%; padding: 5px; margin-left: 15px;">
        <p>
          <strong>Note</strong>&nbsp;&nbsp; @content
        </p>
      </div>
    }

Using a helper in a page

  1. Create a new blank file called TestHelper.cshtml
  2. Add the following code to the file:

    <!DOCTYPE html>
      <head>
        <title>Test Helpers Page</title>
      </head>
      <body>
        <p>This is some opening paragraph text.</p>
    
    <!-- Insert the call to your note helper here. -->
    @MyHelpers.MakeNote("My test note content.")
    
    <p>This is some following text.</p>
      </body>
    </html>

Creative Commons Licence
This work is licensed under a Creative Commons Attribution-NonCommercial-ShareAlike 4.0 International License.