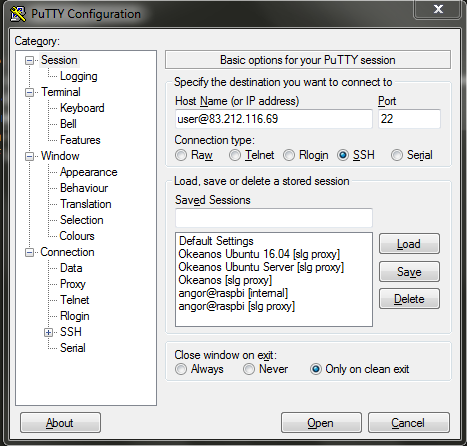
Fill the Host Name (or IP address) field with user@your-vm-public-ipv4 and the Port field with 22
Press Open (and Yes if a Putty Alert-Warning window pops up)
Connect to your VM (2)
For Linux or MacOS devices, open a terminal and use the following command ssh
If your connection is declined and you received the following message @@@@@@@@@@@@@@@@@@@@@@@@@@@@@@@@@@@@@@@@@@@@@@@@@@@@@@@@@@@ @ WARNING: REMOTE HOST IDENTIFICATION HAS CHANGED! @ @@@@@@@@@@@@@@@@@@@@@@@@@@@@@@@@@@@@@@@@@@@@@@@@@@@@@@@@@@@
Execute the following command sudo ssh-keygen -R your-ipv4
If your connection is successful then your terminal will control your VM until you use the following command logout
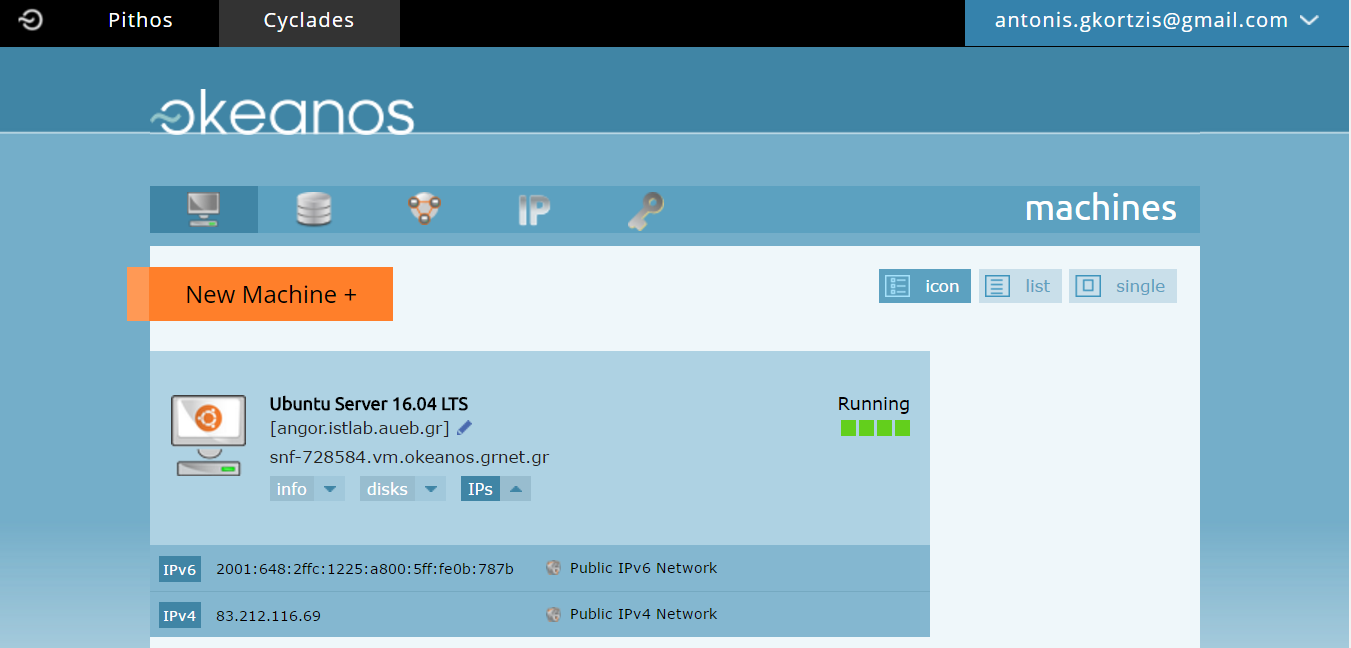
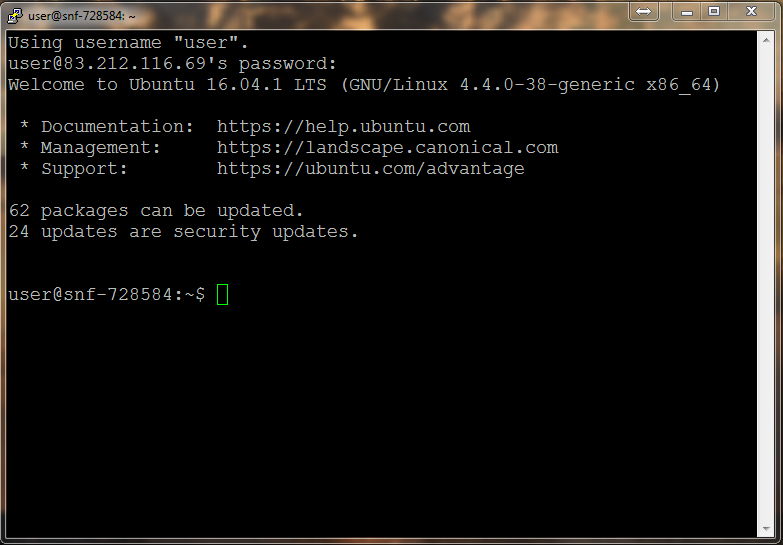
Am I connected?
If the connection was successful you should see something similar to the following picture
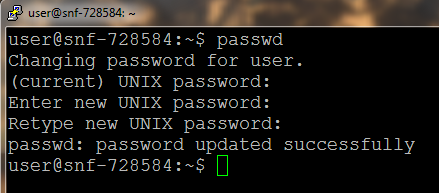
Security - our first priority!
Let's change the password of the default user
In your terminal type the following command (as shown in the screen-shot) passwd
Note that filling the password is not visible on the screen!
Update your system
It's important to keep your system up to date with the latest updates installed. Update your system by executing the following command in your terminal: sudo apt-get -y update && sudo apt-get -y upgrade
Enter your password if asked, and respond "Y" or "y" if asked the following Do you want to continue? [Y/n]
Press Enter and wait until the installation is complete (it might take some time!)
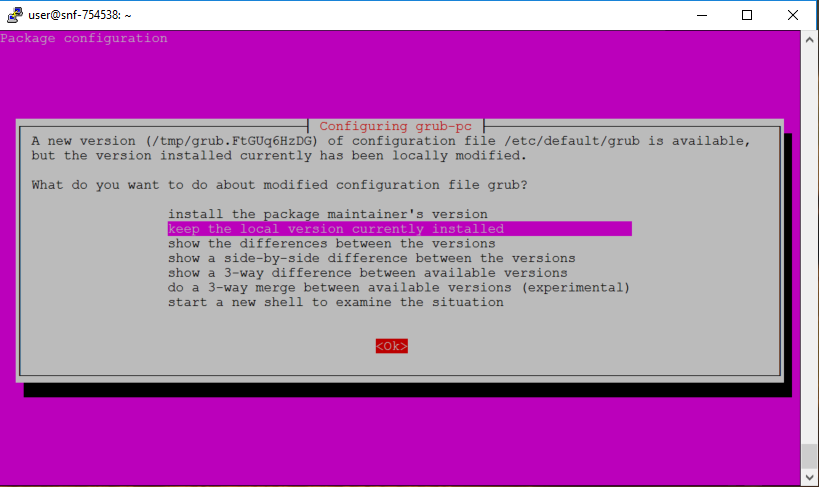
Update your system (2)
Select the second option if you are promted to update the Grub Keep the local version currently installed
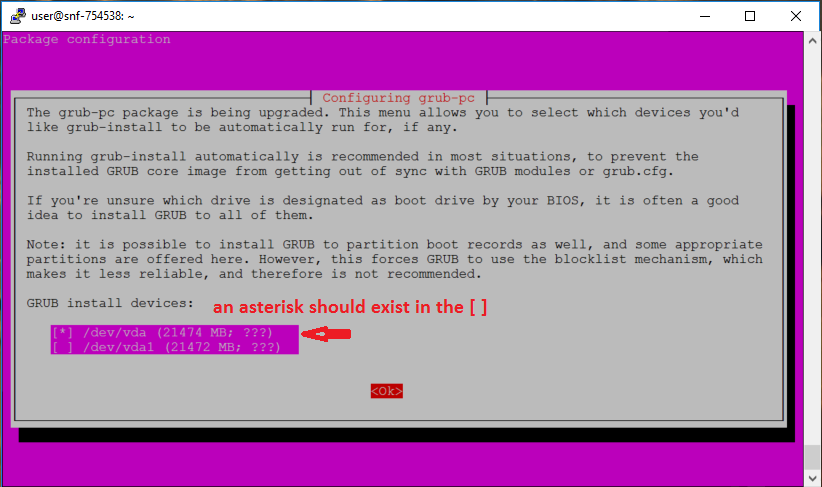
Update your system (3)
Select the first option in the Configuring grup-pc screen /dev/vda
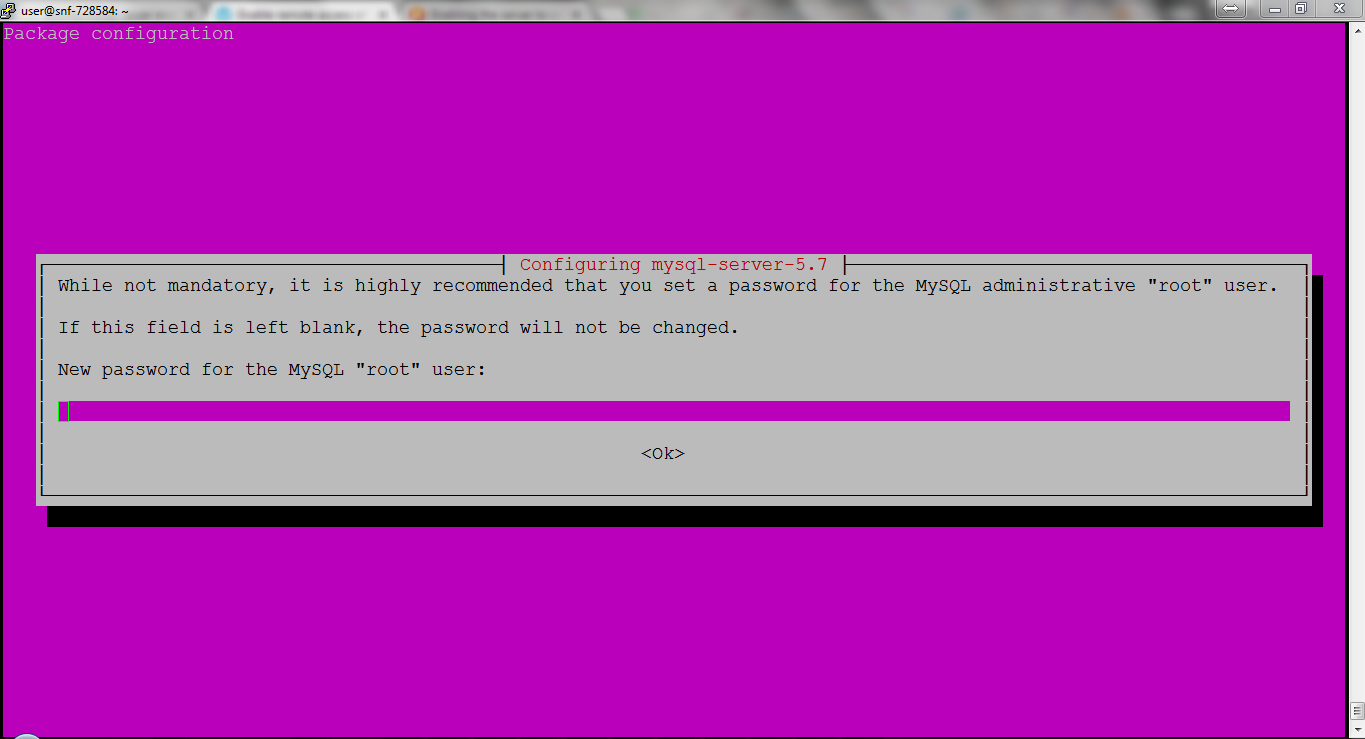
MySQL server
In order to install the latest MySQL server in your system execute the following command in your terminal: sudo apt-get -y install mysql-server
Enter a password when asked (see the following figure).
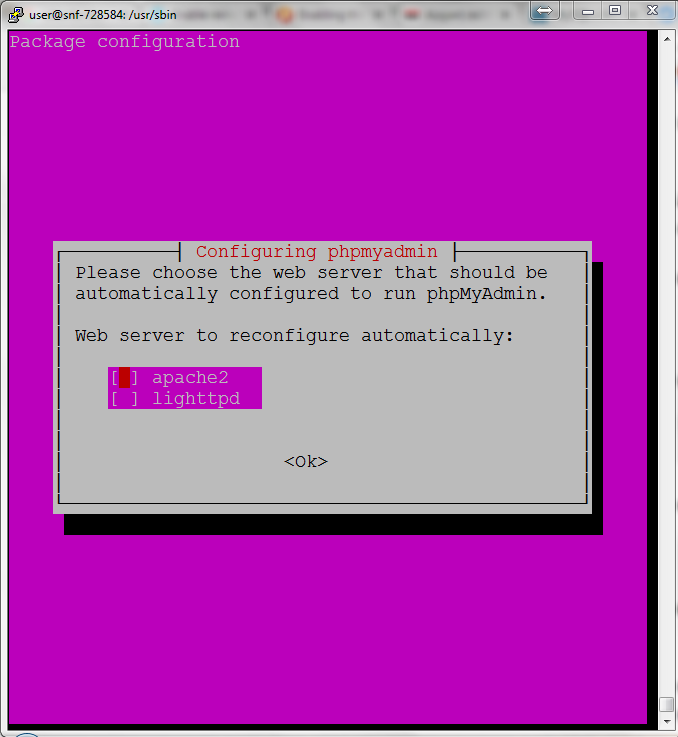
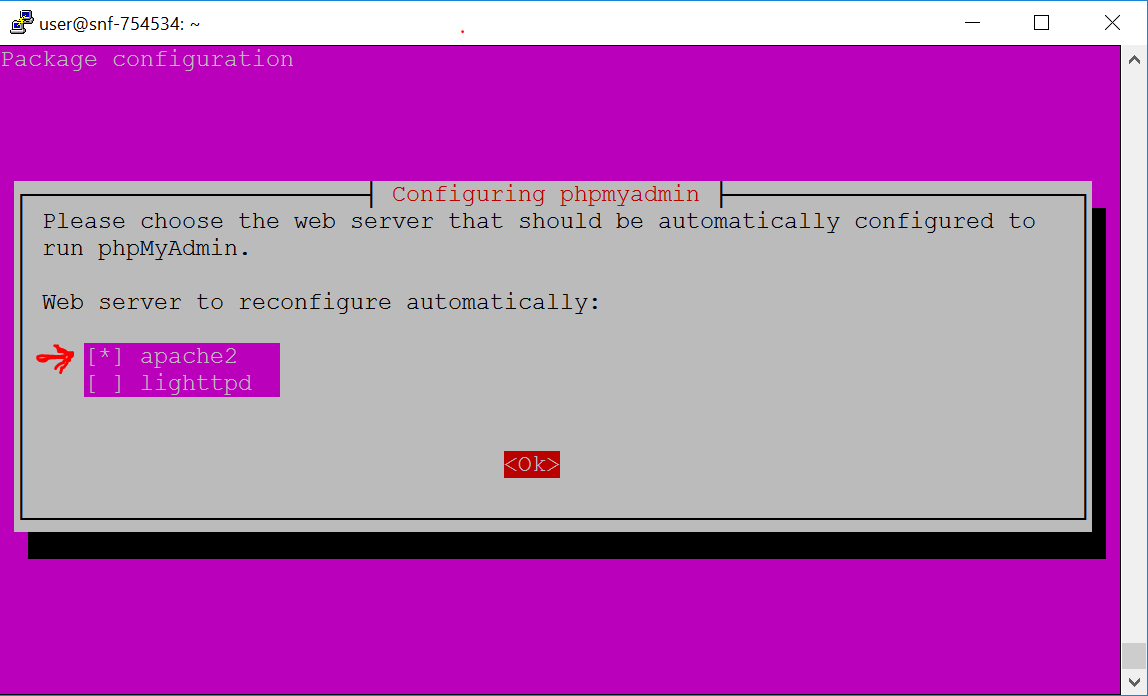
Install a Web-Server and a MySQL web-manager
Execute the following commands in your terminal:
First install the Apache Web-Server sudo apt-get -y install apache2
Create a directory that will store the apache tomcat and unzip the tar.gz that you downloaded earlier in this directory. Execute the following commands sudo mkdir /opt/tomcat; sudo tar xzvf apache-tomcat-8.5.15.tar.gz -C /opt/tomcat --strip-components=1
Set-up the permissions for Tomcat. Execute the following commands cd /opt/tomcat; sudo chgrp -R tomcat /opt/tomcat; sudo chmod -R g+r conf; sudo chmod g+x conf; sudo chown -R tomcat webapps/ work/ temp/ logs/
Configure Apache Tomcat
In your terminal execute the following command to edit the tomcat.service file sudo nano /etc/systemd/system/tomcat.service
Copy-paste the following text in the file (erplace the existing)
Press CTLR + o to save the changes, Enter to verify, and CTRL + x to exit
Allow traffic to port 8080 used by Apache Tomcat by executing the following command sudo ufw allow 8080
Restart Tomcat and set to open on start-up sudo systemctl stop tomcat; sudo systemctl start tomcat; sudo systemctl enable tomcat;
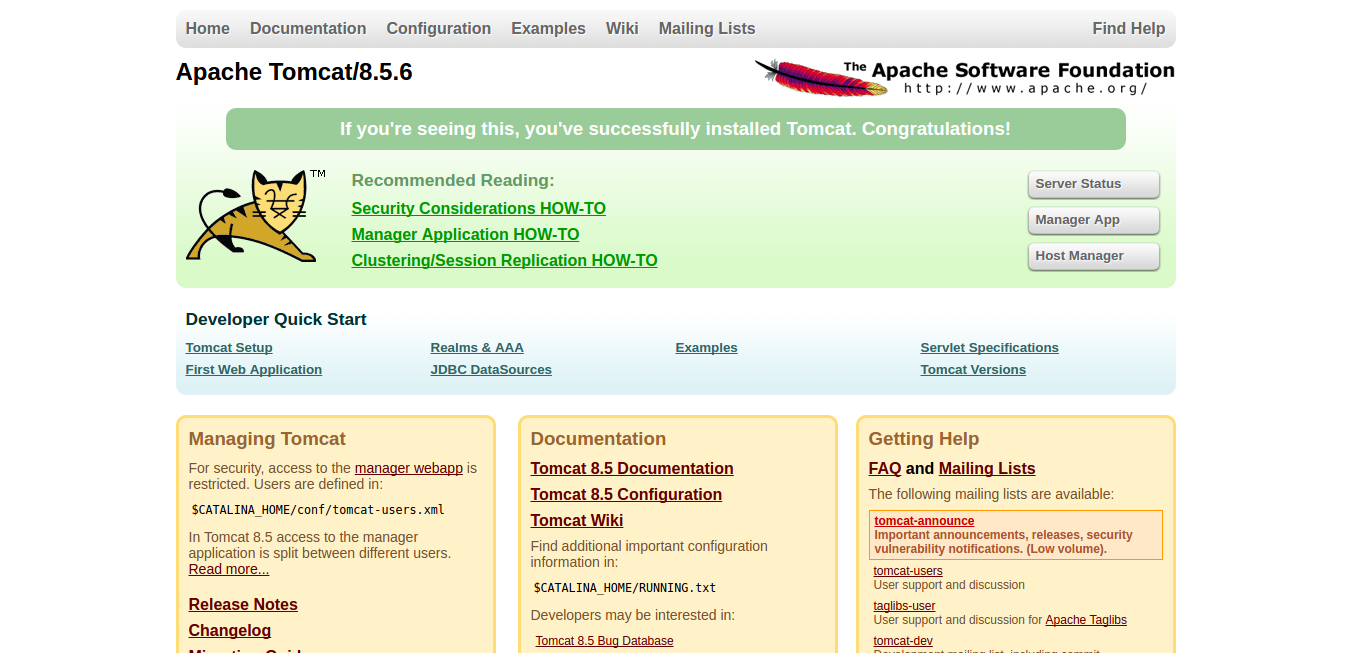
Check if Tomcat is running and listening to the 8080 port. In a web-browser open: http://your-ipv4:8080
If everything is fine you should see a web-page like the one in the next slide!
Configure Apache Tomcat (3)
Configure Apache Tomcat (4)
In order to access the manager-gui and the admin-gui we need to provide credentials at the tomcat-users xml file: sudo nano /opt/tomcat/conf/tomcat-users.xml
Add the following line (with your own "admin" and "password" credentials)
Press CTLR + o to save the changes, Enter to verify, and CTRL + x to exit
Configure Apache Tomcat (5)
In order to allow external access to the manager-gui and the admin-gui we should edit the context xml file, by executing the following command: sudo nano /opt/tomcat/webapps/manager/META-INF/context.xml
Navigate to the file until you find the following entry
Comment the element by adding <!-- at the beginning and --> at the end, like:
Configure Apache Tomcat (6)
Press CTLR + o to save the changes, Enter to verify, and CTRL + x to exit
Make the same changes as in the previous file to the following context xml file by executing the command sudo nano /opt/tomcat/webapps/host-manager/META-INF/context.xml
Restart tomcat
sudo systemctl restart tomcat
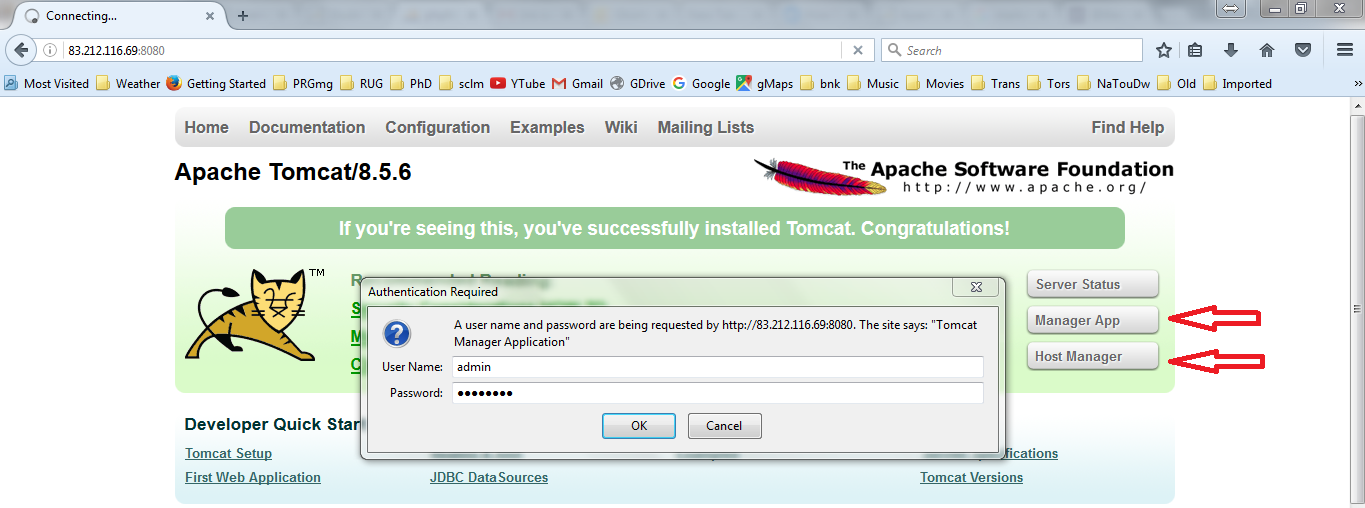
Testing Apache Tomcat
Access your tomcat web-api from a web browser from the following link http://your-ipv4:8080
Make sure that Manager App and Host Manager pages are accessible
When asked for credentials, provide those that you selected in slide "Configure Apache Tomcat (4)"
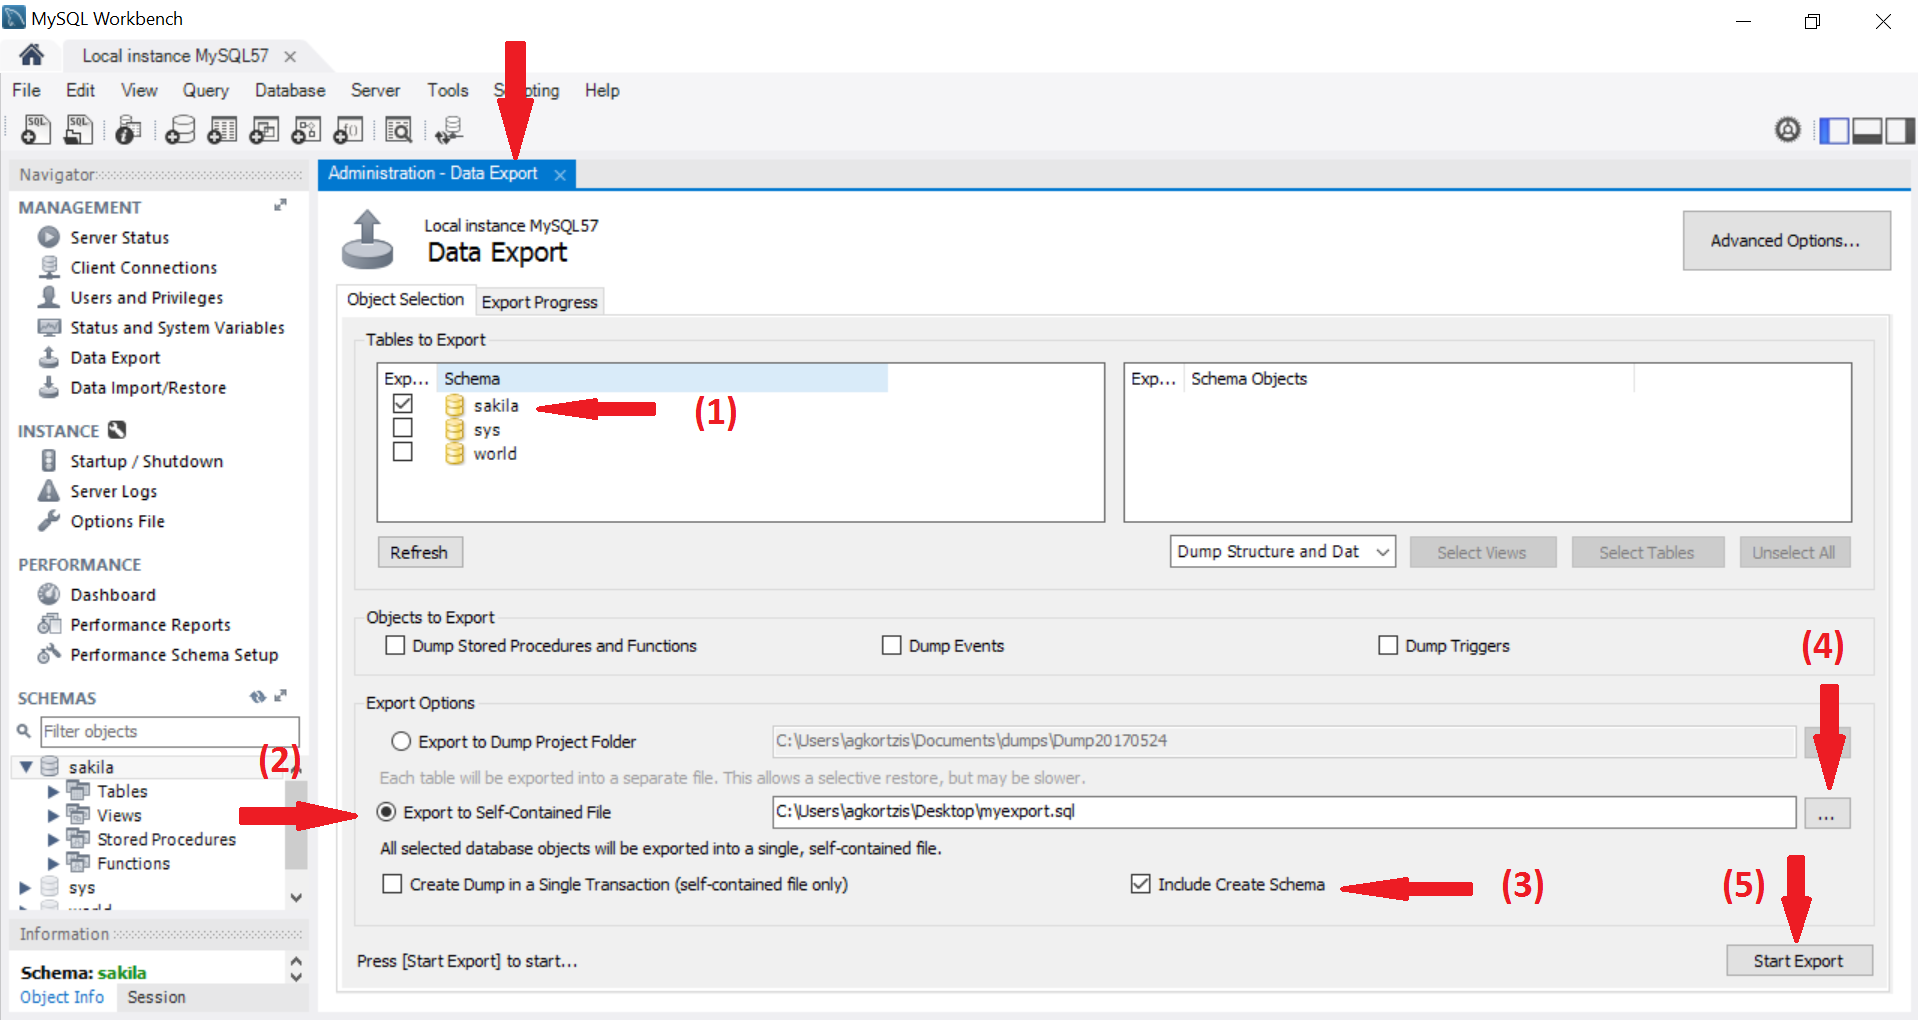
Export your local database
Open the MySQL Workbench, connect to your local database and then go to the Menu Server-->Data Export
Export your local database (2)
In the Objects Selection tab, select the schema that you want to Export
Be sure that the Include Create Schema check box at the bottom is checked and press Start Export
Click "Continue Anyway" if you get a mysqldump Version Mismatch Warning
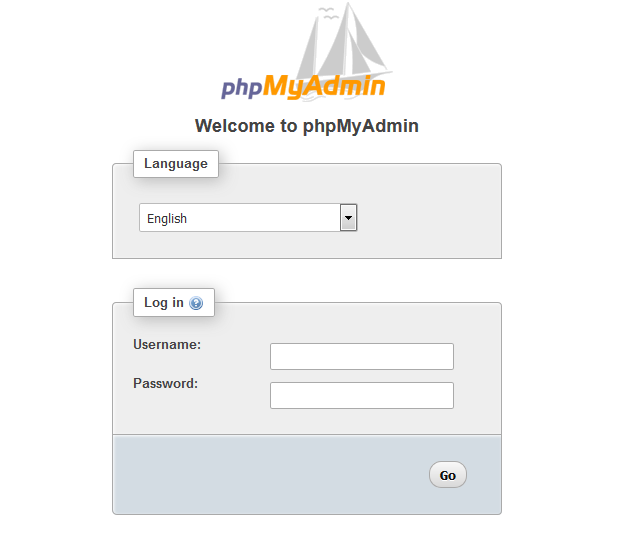
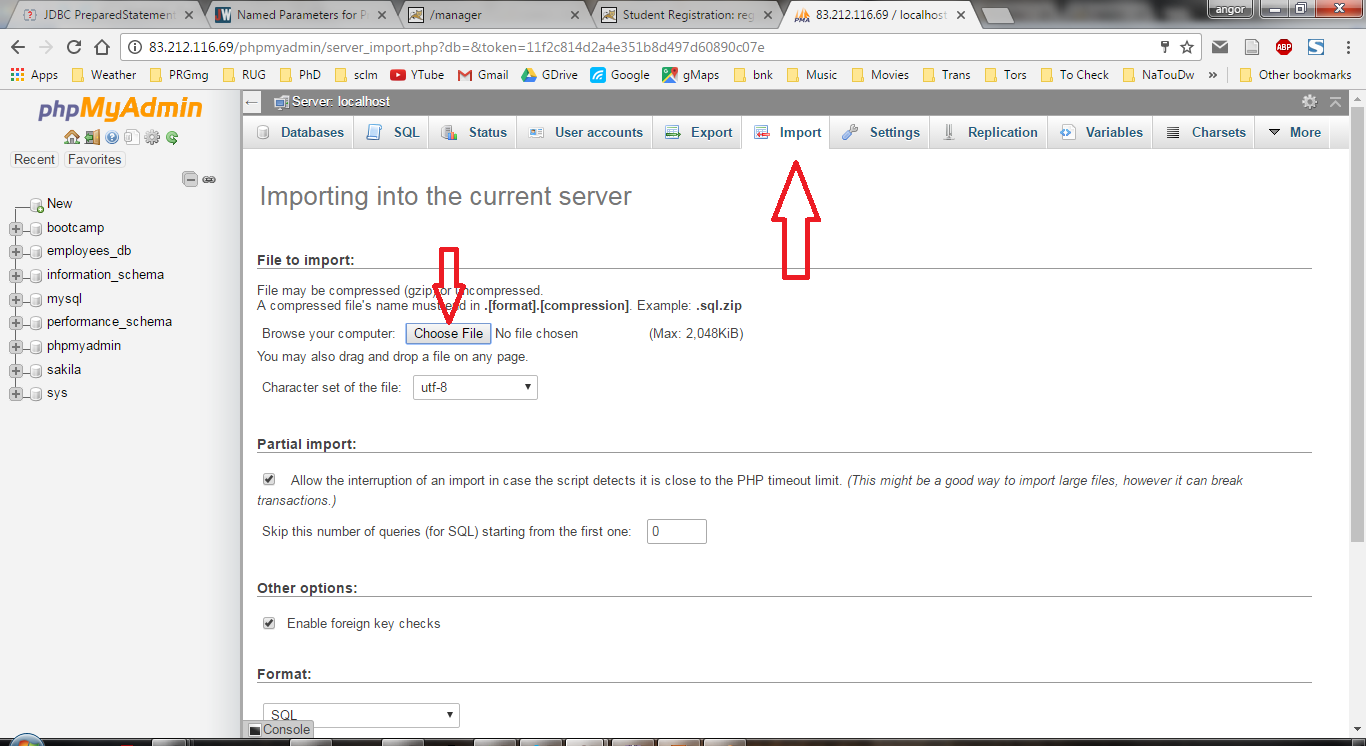
From the top-menu select Import like in the screen-shot presented in the next slide
Upload your database (2)
Upload your database (3)
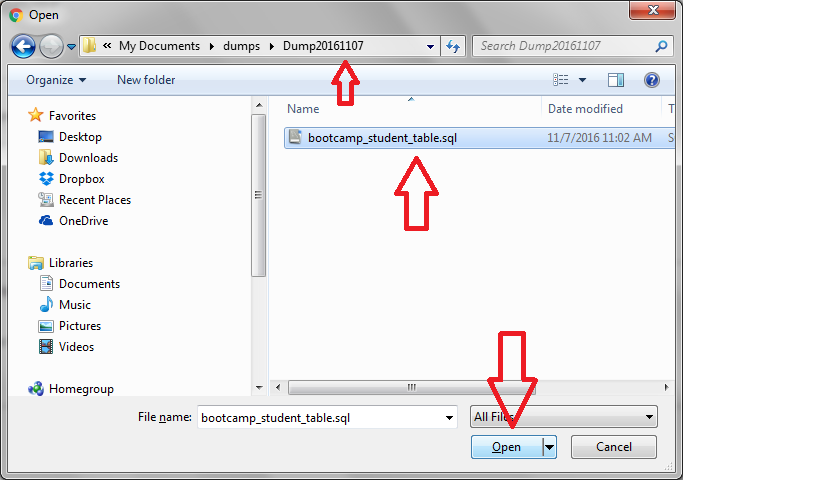
Select Choose file, navigate to the dump file that you exported earlier with MySQL Workbench and select the dump file and then click Go at the end of the page
Export your Java Web Application
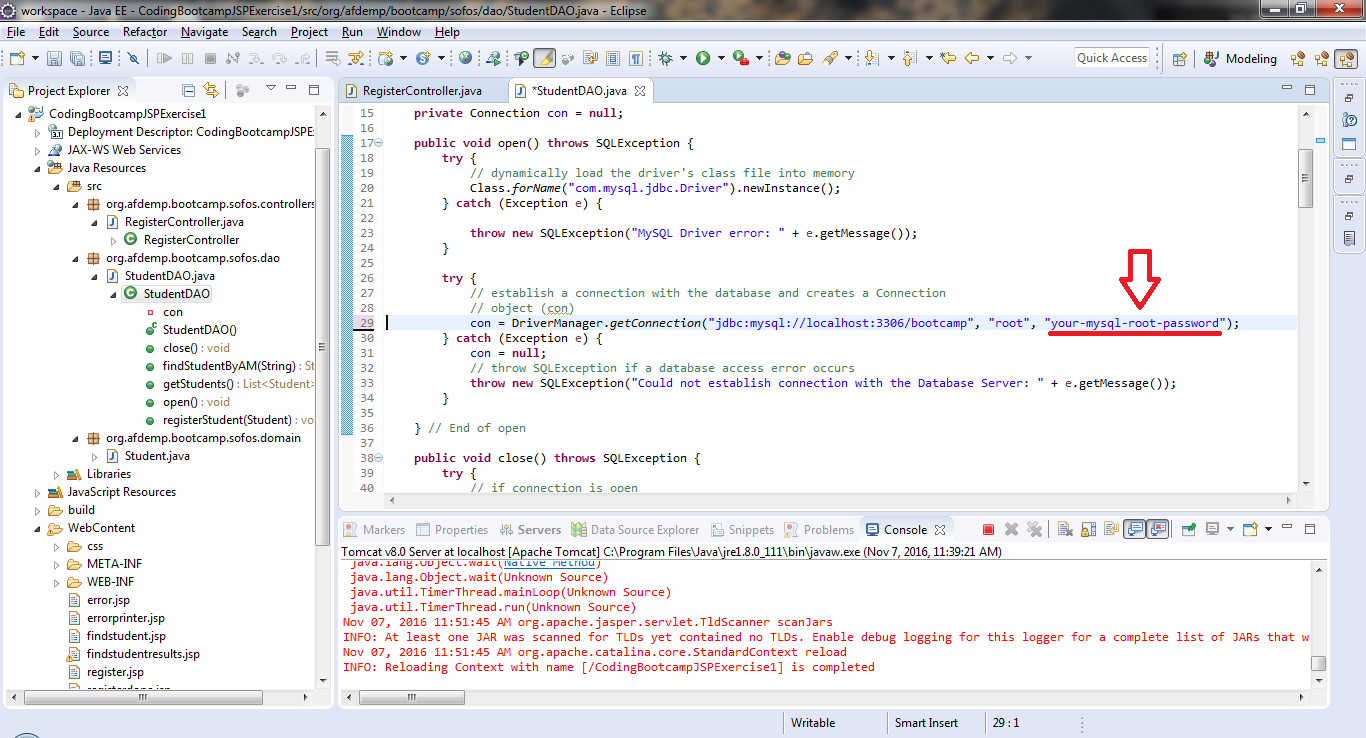
(step 1) be sure that the database credentials in your Java code are the correct for your MySQL at ~okeanos con = DriverManager.getConnection("jdbc:mysql://localhost:3306/the_db_name", "root", "your_password");
Export your Java Web Application (2)
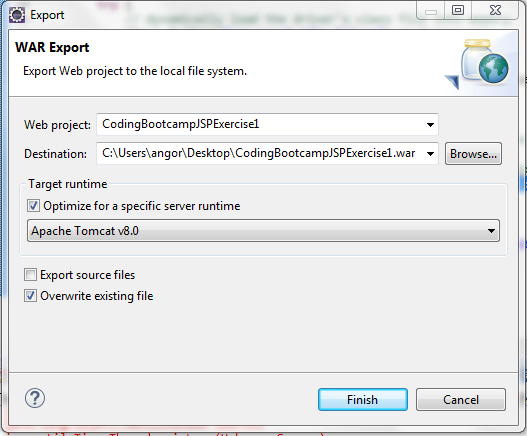
Save all changed files and "Right-click" on the Project-->Export-->WAR file
Be sure that (1) is saved in a location that you remember and (2) is optimized for Tomcat 8.0
Enter the credentials that you declared for the Tomcat management if asked
In the WAR file to deploy sub-section of the Deploy section click the Choose File and select the "CodingBootcampJSPExercise1.war" that you exported earlier on your Desktop
Then click Deploy
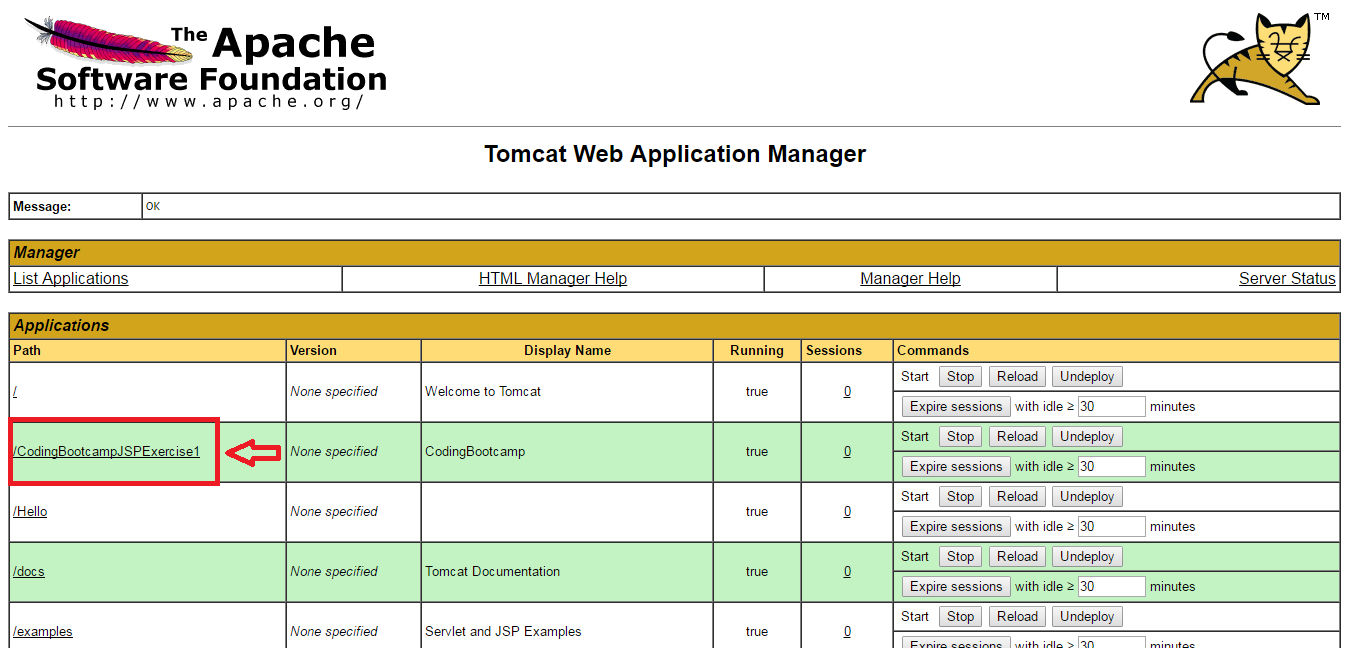
Soon the page should be refreshed and at the top your Servlet should be visible! (Check the next screen-shot)
Run your Java-Web Application
Click the /CodingBootcampJSPExercise1 and check if your web-application is alive!
You can Stop, Reload, Undeploy web-applications
Run your Java-Web Application (2)
In order to redeploy your web-application, first Undeploy and then follow the Deploy the WAR file on the remote server instruction from the beginning.
Hands-on! Exercise
Port your personal assignment in the Remote Server that you just set up!
Export your local database in a dump file and import it to your remote mysql server through phpMyAdmin UI
Export your Java-web-application to a WAR file and deploy it to the remote apache tomcat server through the Tomcat Web Application Manager